Wednesday, July 23, 2008

Just something I like: Sheetload of Cards


I've been subscribing to the SheetLoad of Cards monthly online magazine for, well, months. Here's the concept: every month they send a recipe for making a bunch of cards using a few sheets of cardstock, a few embellishments, and a card map. The instructions are for the bulk production of cards, cutting out all the pieces, then assembling them en masse. What a cool idea. I had to subscribe the second I heard about it. But for a while they've been stacking up in my inbox waiting for me to actually get out the cardstock and put some cards together.


I think what I needed was a reason to make a slew of cards in one sitting. Well, Jen K, who you've heard so very much about here in blogland, was kind enough to offer to bring my cards to Stampin' Up's convention to swap them for me, since I can't make it this year. She's just so darn nice. And she's dilligent. She's making 100 or so cards to bring with her, so I couldn't just hand her 5 or 10 cards and feel like I wasn't a total loser. Enter SheetLoad of Cards! I found my reason to get to work.


My feelings on the results? Though each card isn't it's own individual work of art like most of the cards I create, I'm really happy with them as a set of matched or coordinating copies. Each recipe in the issue I used (July Issue: Christmas in July) creates eight cards. Knowing I want to make a few different kinds to send along with Jen, I only doubled the recipe and still made a nice little assortment of girly pirate cards. The instructions were really clear and easy, and the examples were great. I changed a fair amount of details for my own cards, but that's the great thing about their card maps. They allow for a lot of creativity while keeping things uniform enough to do the assembly line thing.


If you're looking to make something one of a kind or extremely elaborate, you probably don't want to go with this system, but honestly, as lovely as a individually tooled card is, in most cases this is perfect. You create something personal, pretty, and creative while saving time and energy. Since most cards, no matter how treasured, are only kept so long, a system like this makes wonderful sense, particularly in the case of cards with many multiples needed--holiday cards, gift assortments, Valentines, stationery kits, etc. I know I'll be referring to their magazine when I'm working on sets of cards for xmas gifts for my friends and family this year.


Before I forget, there's one more advantage to using the instructions provided: it is fun. I really enjoyed seeing the cards come together, revealing my cards' design even as I made them. So, I say subscribe. All you have to lose is a few sheets of paper and I doubt you'll be less than pleased with the results.

P.S. I hope everyone likes my pirate a la femme. I think it's about time we had a pastel pirate around here. With the amount of glitter all over me, they should be sparkly enough to attract attention, anyway. I looooove glitter and I'm really super glad Stampin ' Up is not retiring it!
Tuesday, July 15, 2008

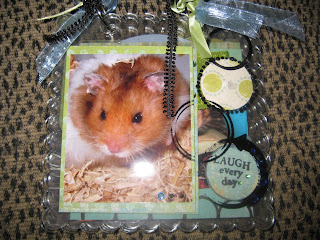
Review: Archivers' Totally Clear Acrylic Album 2 Class


Yep! I made it out of the house on Saturday despite my rather painful weekend (my spine was being quite bitchy, let me tell you.) Archivers' and an acrylic album beckoned and I could not but follow. ;)
This is the cover of the finished album. One thing I have to give Archivers credit for is always using great quality "ingredients". The class was $18, which I think was a fair price considering the outcome. If you just want a clear album, yes, you can make it cheaper on your own, provided you have the necessary stamps or a similar set you're willing to substitute, but I do enjoy the social aspect of the classroom experience, especially getting to see what other people do to their albums to make them unique. Even with explicit instructions, everyone has their own flair.


One thing Archivers has improved on drastically over the last year is its instructor training. In the past I attended some classes that really seemed as if the instructor had never made the project before--or even read the instructions till they got to the class. Not good. When I pay a class fee, I expect that part of that fee is paid to cover the instructor's time and skill, so when an instructor just reads from the same instructions I have sitting in front of me, I'm really unhappy. I can read on my own. Really. I have a rather useless English degree under my belt. This time, our instructor was not only familiar with the class and able to actually teach, she also had a lot of handy tips, tricks, and ideas to share. In the past, I've had instructors get nervous, even snippy, when I diverged from the instructions because I preferred a different look (for example, I almost always do all I can to avoid the colors peach and yellow in any project I make. That's because these colors are gross. Seriously. Gross.) Lisa (the instructor who ran the class) was encouraging and didn't freak out when I dumped out all of the pens and things onto the table to use the little bucket to trace a circle.

I'm only showing a page or two here because I don't want to spoil the class for those who'd like to take it. Let me just say that I was very pleased with the results. One tip I highly recommend is to remember to bring your photos to any album class. Inevitably some parts of the project will be intended to overlap a photo, and you're bound to lose the pieces or have them damaged if you try to take them home and add them later. Also, if you are like me, you will let the album sit around forever waiting for pics to be added if you don't finish it in one sitting. Also, bring your own adhesive. I've never been to a class that wasn't stingy about their adhesive, so I won't blame Archivers for this--it seems to be a disease all instructors are infected with and a pet peeve of mine, but so it goes. I always pack my own. It's especially a good idea to bring your own tape runner when working on a project like this one without any protective sleeves. You want all of your photos and embellishments to withstand a lot of handling.

And yes! Here is another area where Archivers has improved dramatically. Remember that summer themed chipboard book class from last year? The one that took an extra four hours to complete outside of class, even if you did bring your photos? I'm a very quick scrapbooker, relatively speaking, and if I had four hours of extra work, I can only imagine how many of these albums went unfinished. I've started taking their classes again pretty regularly and they seem to have learned that people really prefer to actually finish a project when they take a class. And we don't want to leave the class totally stressed and out of breath from having to endure an intense time crush. The acrylic album class was relaxed, yet kept me busy enough that I didn't get bored and start wandering the store (short attention span). We left with a cute, completed project and a good 20 pictures (or thereabouts) beautifully displayed. Neat!


If you are the kind of person who freaks out about cutting their photos, you may want to bring duplicate copies or choose not to take this class since it does require a fair amount of photo trimming. If you're like me, though, and like something kind of funky and fun, you'll love this class. In the end, the time and money I spent on this class was well worth the results and I do think this album will be one I enjoy for a long time. I also feel confident now that I know how to use acrylic albums, which I didn't feel I could do before. Good class. Take it if you have an Archivers near you.